
Moisture Detection in Spanish Fork & Utah County — Thermal Imaging, Meters, and Capacitance Scanning to Find What You Can’t See
Most water damage that hurts homeowners is the water damage they didn’t know was there. The visible spill on the kitchen floor gets mopped up; the supply line drip behind a Centennial dishwasher doesn’t get noticed for three weeks; the slow shower-pan failure in a Spanish Oaks bathroom migrates through the subfloor for two months before the ceiling stain below it finally appears. By the time the visible evidence shows up, the substrate moisture has spread across hundreds of square feet, microbial colonization has begun, and what would have been a 4-day dry-out becomes a multi-week mold remediation.
Moisture detection is the part of restoration that keeps small problems small. 4Sure Mold Removal performs thermal imaging, penetrating and pinless moisture meter scanning, and capacitance survey work under ANSI/IICRC S500 protocols across Spanish Fork, Springville, Salem, Payson, and Mapleton. Every survey is documented with thermal-image timestamps, point-by-point moisture content readings, and a written report that holds up against insurance scrutiny under Utah Contractor License #961339-4102 and IICRC Firm Certification #923321-2371.
Three Ways We Find Hidden Moisture
1. Thermal Imaging — The First Tool That Goes In
Thermal cameras don’t actually see water. They see temperature differentials — and water, because of its heat capacity, conducts and stores heat differently than dry building materials. A wet drywall section under an ice-dam intrusion appears cooler than the surrounding dry drywall because evaporation cools the surface. A saturated sub-floor under hardwood appears as a thermal plume that follows the moisture migration path, even when the floor surface looks pristine. A slow supply line leak inside a wall cavity creates a vertical thermal gradient that thermal imaging detects long before the drywall paper shows staining.
We use the FLIR E8-XT thermal camera as our primary survey tool — 320×240 IR resolution, ±2°C accuracy, MSX visible-light overlay so the thermal image can be matched directly to the physical location on the wall. The thermal image is the starting point, not the conclusion: any cool spot the thermal camera flags gets confirmed with a moisture meter before any restoration decision is made.
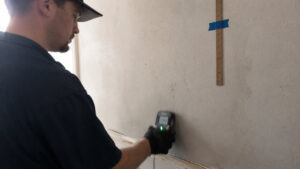
2. Penetrating and Pinless Moisture Meters — The Confirmation Step
Moisture meters measure the actual moisture content of building materials, not just surface temperature. Two types are used together because they answer different questions:
- Penetrating meters (pin-type): Two small pins penetrate the material surface. Electrical resistance between the pins varies with moisture content, giving a numeric reading in %MC for wood substrates or %WME (wood moisture equivalent) for drywall and other materials. Penetrating meters are accurate but leave small pin marks, which is why they’re typically used on substrates already destined for replacement, on baseboards being removed, or on already-disturbed areas.
- Pinless meters (capacitance-type): A flat scanning head measures moisture through electromagnetic field interaction with the substrate. No pins, no marks, no surface penetration. Used for surveying intact finished surfaces — a Maple Mountain Estates kitchen wall that may or may not need to be opened, a Salem bathroom tile installation that’s suspected but not confirmed wet.
We carry Protimeter Hygromaster 2 meters that integrate both functions in one tool, plus dedicated penetrating meters for deep-substrate readings on framing lumber and subfloor sheathing.
3. Capacitance Scanning and Specialty Tools — When Standard Meters Don’t Reach
For specialty substrates and hidden cavities, additional tools come into play:
- Tramex non-invasive moisture scanners: Capacitance-based scanners with deeper penetration than standard pinless meters. Used for concrete slab moisture surveys, masonry walls, dense plaster on lath, and tile-floor moisture assessment.
- Calcium chloride (CaCl) test kits: ASTM F1869 standard test for concrete slab moisture vapor emission, expressed in lbs/1000 sq ft/24 hours. Used when concrete moisture is suspected but capacitance scanning needs verification — typically before laying new flooring after a slab leak repair.
- RH probe insertion (ASTM F2170): Small drilled holes into a concrete slab with relative humidity probes inserted at depth. Returns the slab’s internal RH percentage, which directly predicts whether new flooring adhesives will bond or fail. Essential before new flooring installation in any room with prior slab moisture.
- Borescope inspection: A small fiber-optic camera inserted through a small drilled hole into a wall cavity, attic space, or under-cabinet area. Used to visually confirm hidden moisture, microbial growth, or structural damage without large-scale demolition.
When Moisture Detection Happens — Three Scenarios
Scenario 1: Active Water Loss — Day Zero Survey
The technician arrives at a known water event (burst pipe, sewer backup, ceiling leak) and surveys the affected area before extraction begins. Thermal imaging identifies the boundaries of the wet zone — most water damage extends 30–100% beyond what’s visible to the homeowner. Moisture content readings establish baselines on every affected substrate. The moisture map drawn from this survey determines extraction priority, demolition scope, and drying chamber design.
Scenario 2: Suspicious Symptoms — Investigative Survey
The homeowner notices something off — a musty smell, a stain that wasn’t there last week, a baseboard that feels soft, a high water bill with no obvious source, paint bubbling on a wall, hardwood plank that feels slightly cupped. These are calls where the customer doesn’t yet know whether they have a water problem. The investigative survey uses thermal imaging across all suspect areas, capacitance scanning on intact surfaces, and borescope inspection where a hidden cavity needs visual confirmation. Outcomes split three ways: no moisture found (charge a flat survey fee, send the homeowner home), moisture found within DIY scope (provide written findings and recommendations, no further work needed), or active water damage requiring restoration (proceed to standard mitigation protocol).
Scenario 3: Pre-Project Baseline and Post-Project Verification
Every restoration project includes both ends of the moisture timeline. Day-zero readings establish the documented unaffected reference area (the baseline against which “dry standard” is measured). Final-day readings prove the affected substrates have returned to that baseline. Between those two, daily monitoring readings track the drying curve. The combined dataset is the project’s evidence that the work was actually done — not a marketing claim, not a “trust us, it looks dry,” but documented numerical evidence.
Hidden Moisture Patterns We Find Every Week in Utah County
- Pinhole leaks in 1970s–80s polybutylene supply lines — A homeowner in older Salem, Payson, or downtown Spanish Fork builds reports a high water bill or a faint hiss behind a wall. Thermal imaging traces a vertical gradient down a stud bay; capacitance scanning confirms wet drywall along the line; cutting an inspection hole reveals the pinhole. Common in homes with original polybutylene plumbing.
- Slow shower-pan failures behind tile — A Spanish Oaks or Maple Mountain Estates bathroom shows no visible leakage but the framing behind the shower is saturated. The shower-pan membrane has failed at a corner; water has been migrating into the wall cavity and subfloor for months. Often discovered when a real estate inspection flags soft baseboards or subtle ceiling staining in the room below.
- Bathroom exhaust fans venting into attic cavities — A common 1990s–2000s construction defect where the exhaust fan ducting was capped at the ceiling rather than vented through the roof. Years of shower humidity dump into the attic, condense on cold roof sheathing, and create frost-melt staining and mold colonies. Thermal imaging during a winter survey catches this immediately.
- Refrigerator ice-maker line slow leaks — A 1/4″ plastic supply line splits at the compression fitting behind the refrigerator. Discharge runs down the back of the cabinet base, into the subfloor, under the adjacent hardwood plank. Months of capillary migration before a Centennial homeowner notices floor cupping. Thermal imaging maps the migration path; moisture meters quantify the saturation.
- Crawlspace and rim joist saturation — A Mapleton or Juniper Ridge home with sustained 65%+ crawlspace humidity develops microbial growth across rim joists, vapor barrier, and pier-support framing. Often discovered during HVAC service or when a homeowner finally decides to investigate “the smell” in a forgotten part of the house.
- Ice-dam intrusion paths — A Maple Mountain Estates ceiling shows staining in three rooms; the homeowner assumes three separate leaks. Thermal imaging from inside the attic reveals one entry point at the eave, with meltwater migrating across the roof deck for 20+ feet before finding ceiling penetrations. The visible damage is the tail end of the migration, not the source.
- Slab leaks under tile and hardwood — A Salem home built on a slab develops hot-spot moisture in the kitchen tile. Thermal imaging from above the slab confirms the leak path; capacitance scanning maps the wet area; a plumber locates the failed supply line and effects the repair. Restoration follows the repair.
- Roof penetration failures around skylights, chimneys, and vent stacks — Older Spanish Fork and Springville homes with skylights or chimneys often develop slow leaks at the flashing seams. Thermal imaging traces the leak path through the attic and into ceiling assemblies.
What a Moisture Detection Report Includes
Every survey produces a written report. The report includes:
- Property address and survey date
- Description of the presenting symptom or water event
- Equipment used (FLIR E8-XT, Protimeter Hygromaster 2, Tramex, etc.)
- Thermal images with annotated areas of interest, time-stamped
- Moisture content readings — point-by-point with material type, location, and reading value
- Documented unaffected reference readings on the same materials elsewhere in the property
- Floor plan moisture map with affected zones marked
- Borescope or visual inspection findings (with photos) where applicable
- Conclusion — whether moisture was found, where, severity, and recommended action
- If restoration is recommended: scope of work, equipment count, estimated timeline, and Xactimate-formatted preliminary estimate
The report is delivered to the homeowner the same day or the following business day. If insurance is involved, a copy goes directly to the adjuster with the project file.
Standalone Moisture Detection Surveys
Not every moisture detection job leads to restoration work. We perform standalone moisture surveys in situations where the customer specifically wants documentation rather than mitigation:
- Pre-purchase home inspections — A buyer’s home inspector flagged a possible moisture concern; the buyer wants quantitative confirmation before closing. Common request from real estate agents and home inspectors throughout Utah County.
- Insurance dispute documentation — A homeowner has an active claim where the carrier or another contractor disagrees about the scope of moisture damage. Independent moisture survey from an IICRC-certified firm carries weight in disputes.
- Post-project verification (third-party) — A homeowner used a different restoration company and wants independent confirmation that the work was actually completed to dry standard. We don’t disclose findings to the original contractor without the homeowner’s authorization.
- Property management portfolio inspections — Quarterly or semi-annual surveys of multi-property portfolios for property managers, HOAs, and commercial owners. Catches developing moisture issues before they become full restoration projects.
- “I think we have a problem but we’re not sure” surveys — Homeowners with vague symptoms (smell, stain, soft spot) who want professional assessment before deciding whether to commit to a project.
Standalone survey pricing is typically $185–$450 depending on property size and survey scope. The fee is credited toward project cost if restoration work proceeds with us.
Why Independent Moisture Detection Matters
Restoration estimates without documented moisture readings often get rejected by insurance carriers — adjusters know that “wet drywall” without a moisture meter reading is a guess, not a finding. They also know that some restoration companies inflate scope by claiming wet zones that aren’t actually wet, or shrink scope by missing wet zones that are. Independent moisture documentation, captured before any drying or demolition begins, is what prevents both errors.
The same documentation matters in disputes. If your contractor and your adjuster disagree about whether a Salem bathroom wall is wet, the meter reading is what resolves the disagreement. “It feels dry” doesn’t survive a claim file review; a Protimeter reading of 18% WME paired with a thermal image timestamp does.
Frequently Asked Questions About Moisture Detection
- Can a thermal camera by itself prove there’s water in my wall?
- No — and any contractor who tells you otherwise is overselling the technology. Thermal cameras detect temperature differentials, and wet building materials almost always create those differentials, but other things can too: HVAC duct routing, electrical conduit warmth, sun-warmed exterior walls during certain hours, and even temperature variations from the ambient air can produce thermal anomalies that aren’t water. The thermal image identifies candidates for moisture; a moisture meter confirms them. We never make a restoration recommendation based on thermal imaging alone — the meter reading is what triggers the decision to open a wall, demo a substrate, or invoice for drying. Reports we deliver always pair thermal images with moisture meter readings at the same locations.
- How accurate are pinless moisture meters compared to pin-type, and which should I trust on my Spanish Oaks bathroom wall?
- Both are accurate when used correctly, but they measure different things. Pinless meters measure moisture concentration in the substrate’s near-surface layer (typically the first ¾ to 1¼ inches depending on meter and material). Pin-type meters measure moisture between the two pins at the depth they’re inserted, giving a deeper-substrate reading. For surveying intact finished surfaces (a Spanish Oaks bathroom wall you don’t want to mark up), pinless is the right tool — it’s non-destructive and accurate at the surface depth where mold growth typically begins. For confirming readings before demolition or after the wall is already opened, pin-type gives the deeper reading. Most surveys use pinless first as a non-invasive screen, then switch to pin-type only on areas where readings are elevated and demolition is being considered. We use Protimeter Hygromaster 2 meters that integrate both modes in one tool.
- If I had a leak six months ago and it was repaired, do I still need moisture detection now to make sure nothing’s hidden?
- If the original repair was done well and dried fully, probably not. If you’re not sure — the repair was DIY, the contractor didn’t take moisture readings, you didn’t get a final dry-standard certification — then yes, a one-time moisture survey is worth the $185–$450 cost. Six months is enough time for hidden moisture to either fully dry (good outcome, survey confirms it) or develop into mold colonization that’s now a separate remediation problem (bad outcome, survey identifies it before you sell the house or remodel the area). Real estate agents often request a survey on properties with prior water history before listing, because disclosed prior damage with documented current dry status is much more sellable than disclosed prior damage without verification.
- What’s the difference between moisture detection and a “mold inspection”?
- Different scope and different equipment. Moisture detection finds water — current saturation, hidden leaks, ongoing migration. Mold inspection finds microbial growth — visible colonies, air-quality contamination, contamination patterns. The two overlap because mold needs moisture to grow, so a thorough mold inspection always includes moisture detection, but a moisture detection survey doesn’t necessarily include mold inspection (no air sampling, no tape lifts, no AIHA-accredited lab work). For a property with a known recent water event and no visible mold, moisture detection alone is usually sufficient. For a property with visible growth, musty smell, or no recent known water event but mold-like symptoms, mold inspection (with moisture detection as part of it) is the right call. Mold Inspection & Testing covers the full mold-specific protocol.
- Will my insurance pay for a standalone moisture detection survey, or only for the actual restoration work that follows?
- It depends on the carrier and the situation. For an active water loss claim, the moisture detection survey is part of the mitigation phase and is typically billed within the same Xactimate estimate that covers extraction and drying — adjusters routinely approve it. For a standalone survey without a confirmed loss event (the “I think we have a problem but we’re not sure” scenario), most carriers don’t cover it because there’s no loss event to claim against. The exception is when the survey is requested as part of a previously-opened claim that’s been closed but is being reopened due to suspected hidden damage — that’s covered under the original loss event. If you’re considering a survey and aren’t sure whether it’s claimable, call your agent first; if they say no, the $185–$450 out-of-pocket cost is usually worth it for the documentation.
Contact 4Sure Mold Removal — Spanish Fork Emergency Response
Operating from 1330 S 1400 E in Spanish Fork, our team responds 24/7 across Utah County and typically arrives on-site within 60 minutes of dispatch in Spanish Fork, Springville, Salem, Payson, and Mapleton. For non-emergency moisture surveys — pre-purchase inspections, insurance dispute documentation, suspected hidden leaks, or property management portfolio inspections — call the office line during business hours to schedule.
- Emergency Line (24/7): (385) 247-9387
- Address: 1330 S 1400 E, Spanish Fork, UT 84660
- Email: info@4suremoldremoval.xyz
- Owner: Sean Jacques
- Utah Contractor License: #961339-4102
- IICRC Firm Certification: #923321-2371
Office Hours
- Emergency Service: 24 hours a day, 7 days a week
- Office Staff: Monday – Friday, 8:00 AM – 5:00 PM
- Closed: Weekends and State/Federal Holidays (emergency line always active)